
This is not just a simple Alpha Release. It's a big release for us.
- http://www.jboss.org/hornetq/downloads
- http://www.jboss.org/hornetq/docs
We have done a whole refactoring on 2.2.0, where we have introduced atomic failover and lots of enterprise ready improvements, making it part of JBoss EAP and JBoss7. 2011 was a big year for us and we accomplished a lot at the HornetQ hive.
Since last year we have been working, and investing our resources on making replication to happen, and we didn't want just a simple replication working. We wanted replication with FailBack, and also atomic failover.
So, 2.3.0.Alpha is out now, and the only reason we called it Alpha is because it's the first, very first version of replication with failback. It should be very functional already and we would appreciate feedback about its functionality.
So, here are the enhancements we have made on this release.
- The project is now 100% maven based.
We had gone through some major refactoring and reorganization of the source code to make this happen. Maven can be a burden and every maven hater will understand what I mean, but Maven has made us to organize our source code better and make it more modular. This effort is paying off now.
- Separate jar file for the journal.
If you just need a transactional journal, you can use this jar and use just the Journal alone. It's a very fast journal after all.
- Failback and Failover with replication
Failback by itself is a nice innovation on the open source messaging space. That means you can add a server back and the data will be copied over to the new server.
- Cloud discovery support
This version now also includes cloud ready discovery support, based on JGroups 3.0.10, which can work with lots of cloud providers out there.
And of course 2.3 has all the enhancements and fixes we have done on HornetQ 2.2 along the way. So, we are calling 2.3.0.Alpha because replication still under works. But this is a very good achievement for us.
Thanks for the HornetQ team (Francisco Borges, Andy Taylor, Howard Gao, Justin Bertram, Jeff Mesnil and Clebert Suconic) and contributors like Tomohisa on this achievement.
Full speed ahead on 2.3.0.Final now. We should have more releases often this year until we reach Final/GA. Any feedback is always welcome on making HornetQ 2.3.0 ready
Friday, 13 July 2012
Tuesday, 22 May 2012
Running a HornetQ Server with Maven
As part of our ongoing efforts to simplify using HornetQ we decided to Mavenize the HornetQ examples. Part of this process was to write something that would automatically start (and stop) a HornetQ server, we decided that writing a Maven plugin to do this would be the simplest way.
Once I had written it I realised that this may be useful to other people so we have created a maven-hornetq-project in github and released the first version which is available in the JBoss repository.
I'll discuss here how to configure a simple maven example that will start a HornetQ server, run a JMS Client and then stop the server.
The plug info you need to add to your build plugins is as follows
After that there are 3 possible execution goals to choose from:
This Goal basically starts the server, a typical configuration would look as follows:
The Following table explains what each configuration element is used for:
The runClient goal will basically run any standalone java client and is configured like so:
The Important element here is the clientClass, this basically configures which java class you want to run. The Client also supports setting System properties.
NB You can also configure the normal maven java plugin to run as well as an integration test but since it is sometimes difficult in maven to configure the order of executions between different plugins this makes it easier.
The Stop Goal basically does what it says, its stops the HornetQ Server and is configured like so:
It is important here that you configure the stop goal with the same configuration directory as the start goal.
The following dependencies are required to run the HornetQ plugin, the important thing to remember here is that these must be placed in the plugin its self and not the poms main dependencies. Most later versions of HornetQ are supported but I would suggest using the latest and greatest. These would look something like:
One important thing to note here is that the first dependency is needed for the runClient goal and in this case is actually itself, i.e. the group id and artifact id of the same pom.
All the JMS examples currently in the HornetQ master branch at github which you can use as a reference, the snippets in this post come from the JMS queue example.
Once I had written it I realised that this may be useful to other people so we have created a maven-hornetq-project in github and released the first version which is available in the JBoss repository.
I'll discuss here how to configure a simple maven example that will start a HornetQ server, run a JMS Client and then stop the server.
The plug info you need to add to your build plugins is as follows
<plugin>
   <groupId>org.hornetq</groupId>
   <artifactId>hornetq-maven-plugin</artifactId>
   <version>1.0.0</version>
   ..............
After that there are 3 possible execution goals to choose from:
The Start Goal
This Goal basically starts the server, a typical configuration would look as follows:
<execution>
   <id>start</id>
   <goals>
      <goal>start</goal>
   </goals>
   <configuration>
   <fork>false</fork>
   <waitFor>false</waitFor>
   <hornetqConfigurationDir>myConfigurationDir</hornetqConfigurationDir>
   <useJndi>true</useJndi>
   <jndiHost>localhost</jndiHost>
   <jndiPort>1099</jndiPort>
   <jndiRmiPort>1098</jndiRmiPort>
   <systemProperties>
      <property>

         <name>build.directory</name>
         <value>${basedir}/target/</value>
      </property>
   </systemProperties>
   </configuration>
</execution>
The Following table explains what each configuration element is used for:
| name | description | default |
| fork | Whether or not the server is forked in a new process, if false the server will be started in the same vm as the mvn process although it will have its own classloader. If you are running multiple servers or want some isolation then you should set this to true. | false |
| waitFor | Whether or maven should wait until the server has been stopped before returning from the goal, i.e. if set to true maven will just execute the goal and then block. | false |
| hornetqConfigurationDir | Where the server should pick up its configuration files from, i.e. hornetq-configuration.xml | empty |
| useJndi | Whether or not a JNDI server will be started. | true |
| jndiHost | The Host Name that the JNDI server will bind to | localhost |
| jndiPort | The port that the JNDI server will bind too | 1099 |
| jndiRmiPort | The RMI port that the jndi Server will bind too | 1098 |
| systemProperties | Any System properties you want to set before starting the server. useful when using properties in configuration files. | empty |
The runClient Goal
The runClient goal will basically run any standalone java client and is configured like so:
<execution>
   <id>runClient</id>
   <goals>
      <goal>runClient</goal>
   </goals>
   <configuration>
      <clientClass>org.hornetq.jms.example.QueueExample</clientClass>
         <args>
         <param>jnp://localhost:1099</param>
      </args>
   </configuration>
</execution>
The Important element here is the clientClass, this basically configures which java class you want to run. The Client also supports setting System properties.
NB You can also configure the normal maven java plugin to run as well as an integration test but since it is sometimes difficult in maven to configure the order of executions between different plugins this makes it easier.
The Stop Goal
The Stop Goal basically does what it says, its stops the HornetQ Server and is configured like so:
<execution>
   <id>stop</id>
   <goals>
      <goal>stop</goal>
   </goals>
   <configuration>
      <hornetqConfigurationDir></hornetqConfigurationDir>
   </configuration>
</execution>
It is important here that you configure the stop goal with the same configuration directory as the start goal.
Configuring the Dependencies
The following dependencies are required to run the HornetQ plugin, the important thing to remember here is that these must be placed in the plugin its self and not the poms main dependencies. Most later versions of HornetQ are supported but I would suggest using the latest and greatest. These would look something like:
<dependencies>
   <dependency>
     <groupId>org.hornetq.example</groupId>
     <artifactId>hornetq-jms-queue-example</artifactId>
     <version>${project.version}</version>
   </dependency>
   <dependency>
     <groupId>org.hornetq</groupId>
     <artifactId>hornetq-core</artifactId>
     <version>2.2.14.Final</version>
   </dependency>
   <dependency>
     <groupId>org.hornetq</groupId>
     <artifactId>hornetq-jms</artifactId>
     <version>2.2.14.Final</version>
   </dependency>
   <dependency>
     <groupId>org.jboss.netty</groupId>
     <artifactId>netty</artifactId>
     <version>3.2.3.Final</version>
   </dependency>
   <dependency>
     <groupId>org.jboss.javaee</groupId>
     <artifactId>jboss-jms-api</artifactId>
     <version>1.1.0.GA</version>
   </dependency>
   <dependency>
     <groupId>org.jboss.naming</groupId>
     <artifactId>jnpserver</artifactId>
     <version>5.0.3.GA</version>
   </dependency>
</dependencies>
One important thing to note here is that the first dependency is needed for the runClient goal and in this case is actually itself, i.e. the group id and artifact id of the same pom.
All the JMS examples currently in the HornetQ master branch at github which you can use as a reference, the snippets in this post come from the JMS queue example.
Messaging with JMS and MDBs on OpenShift
A suite of Quick starts that have been written to demonstrate the use of Java EE 6 on JBoss AS7 have been written and are available here. As part of this suite we have written an example that uses JMS and MDB's to show how to deploy an MDB and post a message to it via a JMS client. The quick start itself can be found here and the Read me takes you through all the steps needed to do deploy and run the example.
The example also demonstrates how to deploy the example using Openshift. OpenShift is Red Hat's free, Cloud Application Platform as a Service offering which allows application developers and teams to build, test, deploy, and run their applications easily. Pete Muir has created a screencast which takes you step by step through how to do this.
The example also demonstrates how to deploy the example using Openshift. OpenShift is Red Hat's free, Cloud Application Platform as a Service offering which allows application developers and teams to build, test, deploy, and run their applications easily. Pete Muir has created a screencast which takes you step by step through how to do this.
Friday, 20 April 2012
HornetQ 2.2.14 released
HornetQ 2.2.14.Final is the latest community release and contains many fixes and performance enhancements that have gone into both JBoss AS7 and JBoss Enterprise platforms.
You can download it here.
Tuesday, 18 October 2011
Stomp 1.1 Support in HornetQ
HornetQ now supports the Stomp 1.1 protocol and will be available in the next release, for now though it is part of trunk in the SVN repository.
Stomp 1.1 specification is an update to Stomp 1.0 and is backward compatible. New features include protocol negotiation, heartbeat, the NACK frame and virtual hosting.
An example 'stomp 1.1' is also available in the SVN repository which demonstrates a stomp client that uses one of the new features 'protocol negotiation', lets take a look at the example now.
1. Configuring a HornetQ Stomp Server
First of all we need to configure the server to allow stomp connections by adding a stomp acceptor, this is the same as stomp 1.0.
<acceptor name="stomp-acceptor">
<factory-class>org.hornetq.core.remoting.impl.netty.NettyAcceptorFactory</factory-class>
<param key="protocol" value="stomp" />
<param key="port" value="61613" />
</acceptor>
2. Connection Negotiation
Once the HornetQ Stomp server is up and running, it is up to the Stomp client to decide which Stomp specification to use to communicate with HornetQ. This is done by connection negotiation. The Stomp1.1 example shows how to do this
// Step 1. Create a TCP socket to connect to the Stomp port
Socket socket = new Socket("localhost", 61613);

// Step 2. Send a CONNECT frame to connect to the server
String connectFrame = "CONNECT\n" +
"accept-version:1.1\n" +
"host:localhost\n" +
"login:guest\n" +
"passcode:guest\n" +
"request-id:1\n" +
"\n" +
END_OF_FRAME;

sendFrame(socket, connectFrame);
In the above code you can see that the client sends a CONNECT stomp frame with the accept-version set to 1.1, this tells the server that the client is using the 1.1 protocol.
Also new to 1.1 is the host header which is used to configure the virtual host to use, although HornetQ supports setting the header it doesn't support virtual hosts. All other headers are standard Stomp 1.0 headers.
Also new to 1.1 is the host header which is used to configure the virtual host to use, although HornetQ supports setting the header it doesn't support virtual hosts. All other headers are standard Stomp 1.0 headers.
If the server accepts the connection request, it will return a 'CONNECTED' stomp with a 'version' header whose value is 1.1. The example prints this to the console:
...
[java] response: CONNECTED
[java] version:1.1
[java] session:1337300467
[java] server:HornetQ/2.2.5 HornetQ Messaging Engine
[java] response-id:1
...
3. Sending and receiving messages.
Once connected, the client can send and receive Stomp messages with the connection. The example illustrates how to send a stomp message:
// Step 3. Send a SEND frame (a Stomp message) to the
// jms.queue.exampleQueue address with a text body
String text = "Hello World from Stomp 1.1 !";
String message = "SEND\n" +
 "destination:jms.queue.exampleQueue\n" +
 "\n" +
 text +
 END_OF_FRAME;
sendFrame(socket, message);
You can see this is very much the same as a Stomp 1.0 client. The message will be sent to the destination 'jms.queue.exampleQueue'. For the mapping of destination headers to HornetQ jms addresses please refer to the HornetQ's User Manual.
Note: Please pay attention to the leading and trailing spaces in the headers. Stomp 1.0 usually trims off the spaces before processing. But in Stomp 1.1, those spaces are preserved. So in Stomp1.1 unnecessary spaces in headers may result in strange errors which is difficult to find.
4. Enabling Heartbeats
One important feature added to Stomp 1.1 is the heartbeats used to monitor the underlying connection. The heart-beating is established at connection time, using a special header 'heart-beat' in CONNECT frame. For example:
CONNECT
accept-version:1.1
host:127.0.0.1
login:guest
passcode:guest
heart-beat:500,1000
Once connected with the above frame, the HornetQ server will make sure that a stomp frame (or a heartbeat byte) is sent to the client every 1 second (1000 milliseconds). Meanwhile the client should send a stomp frame (or a heartbeat byte) for every 500 milliseconds.
HornetQ server will deem a connection to be broken if it hasn't receive a stomp frame from the client via this connection for a time longer than 2 times of the client heart-beat interval (i.e. 2*500). So for the above case, if it hasn't receive any frame within a second, the server will close the connection.
Note: HornetQ specifies a minimum value for both client and server heart-beat intervals. The minimum interval for both client and server heartbeats is 500 milliseconds. That means if a client sends a CONNECT frame with heartbeat values lower than 500, the server will defaults the value to 500 milliseconds regardless the values of the 'heart-beat' header in the frame.
The HornetQ 1.1 implementation also has several performance improvements however we will continue to improve this over the coming months.
For more information read the stomp specification
Thursday, 1 September 2011
HornetQ on JBoss AS7
Now that JBoss AS 7.0.1 has been released which includes messaging and MDB's I thought we would write a quick tutorial on how to get started deploying JMS resources and MDB's.
We have recently blogged about our achievements on SpecJMS and EAP 5.1.2 and of course the version shipped with AS7 has all the same functionality and performance levels that are available in the EAP platform.
This tutorial will demonstrate how HornetQ is configured on AS7, I Will explain the main concepts of how to configure HornetQ server configuration and JMS resources and also provide an example MDB that we can run. So first of all you will need to download AS7 from here.
Make sure you download the 'everything' version as the web profile does not contain messaging or MDB's by default.
In AS7 there's is a single configuration file, either standalone.xml or domain.xml, which is broken into subsystems. These files are pretty much identical although there are differences however this is beyond the scope of this article. For more information on AS7 and its configuration take a look at the AS7 users guide here.
By default the messaging subsystem isn't enabled however a preview configuration is provided that does contain a messaging subsystem. these are standalone-preview.xml and domain-preview.xml, for this tutorial we will use the standalone-preview.xml. To run the preview configuration simply execute the command from the bin directory:
./standalone.sh --server-config=standalone-preview.xml
You should see the HornetQ server started along with some JMS resources, quick wasn't it. Now lets take a closer look at the messaging configuration itself. Each subsystem has its own domain named that is defined by a schema, the schema for the messaging subsystem can be found in docs/schema/jboss-as-messaging_1_0.xsd in the AS7 distribution.
If you search for jboss:domain:messaging in the standalone-preview.xml you will find the HornetQ subsystem configuration.
If you have used HornetQ standalone or in JBoss 6 you will be familiar with some of the configuration. The first part is basically the same as in the hornetq-configuration.xml file. This looks like:
This is the basic server configuration and the configuration of connectors and acceptors. The only difference here to the standalone HornetQ configuration is that the connectors and acceptors use bindings rather than explicitly defining hosts and ports, these can be found in the socket-binding-group part of the configuration.
For more information on configuring the core server please refer to the HornetQ user manual.
The rest of the subsystem configuration is all JMS resources. firstly you will see some JMS connection factories of which there are two types. Firstly basic HornetQ connection factories:
These are basically normal connection factories that would be looked up via any external client and controlled via HornetQ itself. Secondly you will see pooled connection factories, like so:
These are pooled connection factories and although connect to HornetQ the connections themselves are under the control of the application server. If you have previous experience with older versions of the application server this is the connection factory that would be typically defined in the jms-ds.xml configuration file.
The pooled connection factories also define the incoming connection factory for MDB's, the name of the connection factory refers to the resource adapter name used by the MDB, in previous Jboss application servers this is typically the configuration found in the ra.xml config file that defined the resource adapter.
Lastly you will see some destinations defined like so:
These are your basic JMS Topics and Queues where entry name is their location in JNDI.
Now lets take a simple MDB example build and deploy it and configure the server for it. A sample MDB and client can be found here and uses Maven to build. Download it and run mvn package to build the application ear file.
The example is a simple request/response pattern so before we deploy the MDB we need to configure 2 queues mdbQueue and mdbReplyQueue like so:
now restart (or start) the Application Server and copy the ear file from mdb/mdb-ear/target to the standalone/deployments directory in the AS7 installation. you should now see the mdb deployed. Now we can run the client, simply run the command mvn -Pclient test and the client will send a message and hopefully receive a message in reply.
Congratulations, you have now configured HornetQ and deployed an MDB.
We have recently blogged about our achievements on SpecJMS and EAP 5.1.2 and of course the version shipped with AS7 has all the same functionality and performance levels that are available in the EAP platform.
This tutorial will demonstrate how HornetQ is configured on AS7, I Will explain the main concepts of how to configure HornetQ server configuration and JMS resources and also provide an example MDB that we can run. So first of all you will need to download AS7 from here.
Make sure you download the 'everything' version as the web profile does not contain messaging or MDB's by default.
In AS7 there's is a single configuration file, either standalone.xml or domain.xml, which is broken into subsystems. These files are pretty much identical although there are differences however this is beyond the scope of this article. For more information on AS7 and its configuration take a look at the AS7 users guide here.
By default the messaging subsystem isn't enabled however a preview configuration is provided that does contain a messaging subsystem. these are standalone-preview.xml and domain-preview.xml, for this tutorial we will use the standalone-preview.xml. To run the preview configuration simply execute the command from the bin directory:
./standalone.sh --server-config=standalone-preview.xml
You should see the HornetQ server started along with some JMS resources, quick wasn't it. Now lets take a closer look at the messaging configuration itself. Each subsystem has its own domain named that is defined by a schema, the schema for the messaging subsystem can be found in docs/schema/jboss-as-messaging_1_0.xsd in the AS7 distribution.
If you search for jboss:domain:messaging in the standalone-preview.xml you will find the HornetQ subsystem configuration.
If you have used HornetQ standalone or in JBoss 6 you will be familiar with some of the configuration. The first part is basically the same as in the hornetq-configuration.xml file. This looks like:
<!-- Default journal file size is 10Mb, reduced here to 100k for faster first boot -->
<journal-file-size>102400</journal-file-size>
<journal-min-files>2</journal-min-files>
<journal-type>NIO</journal-type>
<!-- disable messaging persistence -->
<persistence-enabled>false</persistence-enabled>

<connectors>
<netty-connector name="netty" binding="messaging">
<netty-connector name="netty-throughput" binding="messaging-throughput">
   <param key="batch-delay" value="50">
</netty-connector>
<in-vm-connector name="in-vm" id="0">
</in-vm-connector>

<acceptors>
<netty-acceptor name="netty" binding="messaging">
<netty-acceptor name="netty-throughput" binding="messaging-throughput">
   <param key="batch-delay" value="50">
   <param key="direct-deliver" value="false">
</netty-acceptor>
<in-vm-acceptor name="in-vm" id="0">
</in-vm-acceptor>

<security-settings>
<security-setting match="#">
   <permission type="createNonDurableQueue" roles="guest">
   <permission type="deleteNonDurableQueue" roles="guest">
   <permission type="consume" roles="guest">
   <permission type="send" roles="guest">
</permission>
</permission>

<address-settings>
<!--default for catch all-->
<address-setting match="#">
   <dead-letter-address>jms.queue.DLQ</dead-letter-address>
   <expiry-address>jms.queue.ExpiryQueue</expiry-address>
   <redelivery-delay>0</redelivery-delay>
   <max-size-bytes>10485760</max-size-bytes>
   <message-counter-history-day-limit>10</message-counter-history-day-limit>
   <address-full-policy>BLOCK</address-full-policy>
</address-setting>
</address-settings>
This is the basic server configuration and the configuration of connectors and acceptors. The only difference here to the standalone HornetQ configuration is that the connectors and acceptors use bindings rather than explicitly defining hosts and ports, these can be found in the socket-binding-group part of the configuration.
For more information on configuring the core server please refer to the HornetQ user manual.
The rest of the subsystem configuration is all JMS resources. firstly you will see some JMS connection factories of which there are two types. Firstly basic HornetQ connection factories:
<connection-factory name="RemoteConnectionFactory">
<connectors>
   <connector-ref connector-name="netty"/>
</connectors>
<entries>
   <entry name="RemoteConnectionFactory"/>
</entries>
</connection-factory>
These are basically normal connection factories that would be looked up via any external client and controlled via HornetQ itself. Secondly you will see pooled connection factories, like so:
<pooled-connection-factory name="hornetq-ra">
<transaction mode="xa"/>
<connectors>
   <connector-ref connector-name="in-vm"/>
</connectors>
<entries>
   <entry name="java:/JmsXA"/>
</entries>
</pooled-connection-factory>
These are pooled connection factories and although connect to HornetQ the connections themselves are under the control of the application server. If you have previous experience with older versions of the application server this is the connection factory that would be typically defined in the jms-ds.xml configuration file.
The pooled connection factories also define the incoming connection factory for MDB's, the name of the connection factory refers to the resource adapter name used by the MDB, in previous Jboss application servers this is typically the configuration found in the ra.xml config file that defined the resource adapter.
Lastly you will see some destinations defined like so:
<jms-destinations>
 <jms-queue name="testQueue">
    <entry name="queue/test"/>
 </jms-queue>
 <jms-topic name="testTopic">
    <entry name="topic/test"/>
 </jms-topic>
</jms-destinations>
These are your basic JMS Topics and Queues where entry name is their location in JNDI.
Now lets take a simple MDB example build and deploy it and configure the server for it. A sample MDB and client can be found here and uses Maven to build. Download it and run mvn package to build the application ear file.
The example is a simple request/response pattern so before we deploy the MDB we need to configure 2 queues mdbQueue and mdbReplyQueue like so:
<jms-queue name="mdbQueue">
 <entry name="queue/mdbQueue"/>
</jms-queue>
<jms-queue name="mdbReplyQueue">
  <entry name="queue/mdbReplyQueue"/>
</jms-queue>
now restart (or start) the Application Server and copy the ear file from mdb/mdb-ear/target to the standalone/deployments directory in the AS7 installation. you should now see the mdb deployed. Now we can run the client, simply run the command mvn -Pclient test and the client will send a message and hopefully receive a message in reply.
Congratulations, you have now configured HornetQ and deployed an MDB.
Wednesday, 13 July 2011
8.2 million messages / second with SpecJMS
The latest version of HornetQ as part of JBoss EAP 5.1.2 has once again been
benchmarked against SPECjms2007 (c).
HornetQ is also included on JBoss AS7, which contains the same improvements we have made to achieve this performance. You will also be able to get the same performance figures with JBoss AS7.
This latest benchmark has outperformed HornetQ's latest publication by a good margin
already.
With this latest result HornetQ sustained a load of about 8 million messages per
second.
SpecJMS is a peer reviewed benchmark and is the first industry standard and has strict
rules as to how each messaging system is configured. This is to make sure that vendors
don't cheat when it comes to persistence and transactional requirements etc. SPEC is an independent corporation comprised of
representatives from commercial and academic organisations. The corporation creates many
industry standard benchmarks for Java amongst others. The
benchmark simulates how a Message System would be used in a real world scenario.
The
software supports three topologies, Horizontal, Vertical and Freeform. Only Horizontal
and Vertical can be used for publishing a result. Freeform can be useful to create a
custom workload to test the Messaging System for a given usecase.
Horizontal Topology is where the benchmark scales the number of Topic Subscriptions
and Queues whereas a Vertical topology has a fixed number of queues but sends varying
volumes of messages depending on the scale.
* The Horizontal results can be found here
* and the Vertical results here.
The scale is configured by setting the BASE configuration property value. At first
glance the results can look quite confusing but here is a breakdown of the
results:
- What this means in terms of actual performance:
HornetQ sustained a load of about 6 million messages on the vertical topology this can
be seen by looking at the following graph

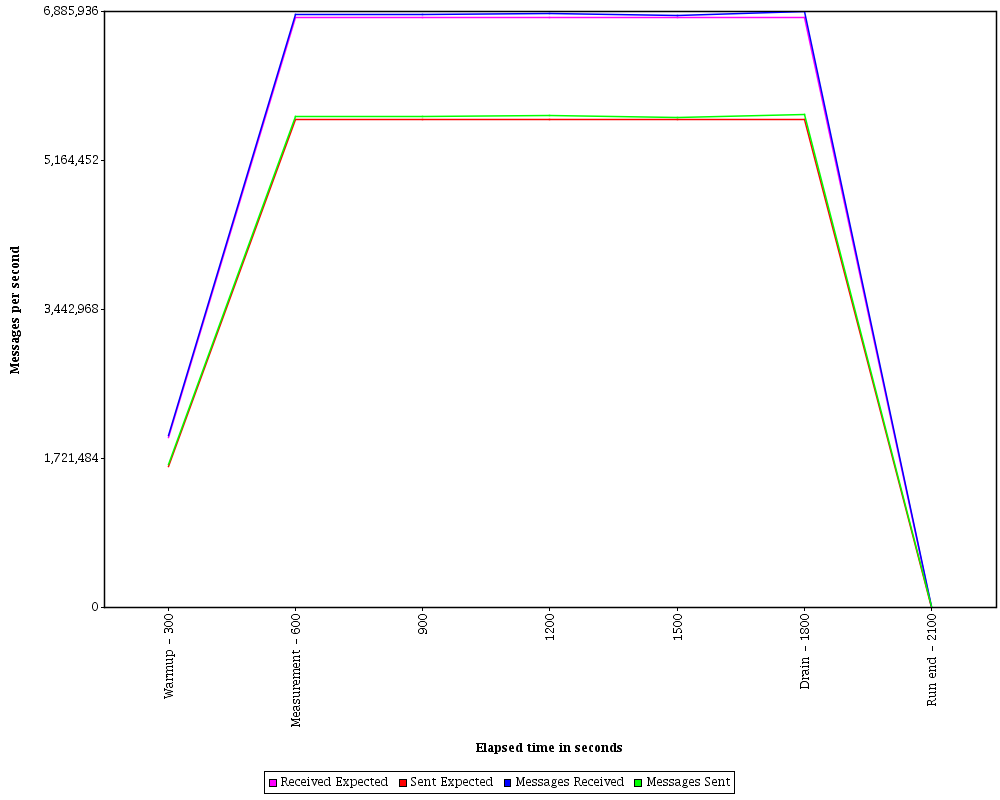
Horizontally HornetQ achieved about 8 million messages per second which is shown on the runtime graph.

The runtime graph is used to show the following:
- The expected versus actual message rates. These provide a quickly check the benchmark driver created enough load for the configured scale.
- The message sent/received spread. You can expect this because topics are used in the benchmark and many clients will receive a single sent message.
- In the Horizontal topology the spread will be greater than Vertical. Horizontal topology by it's nature has a greater distribution of messaging clients.
The system configuration diagram shows the hardware installation used for this result and necessary to
get similar levels of performance.
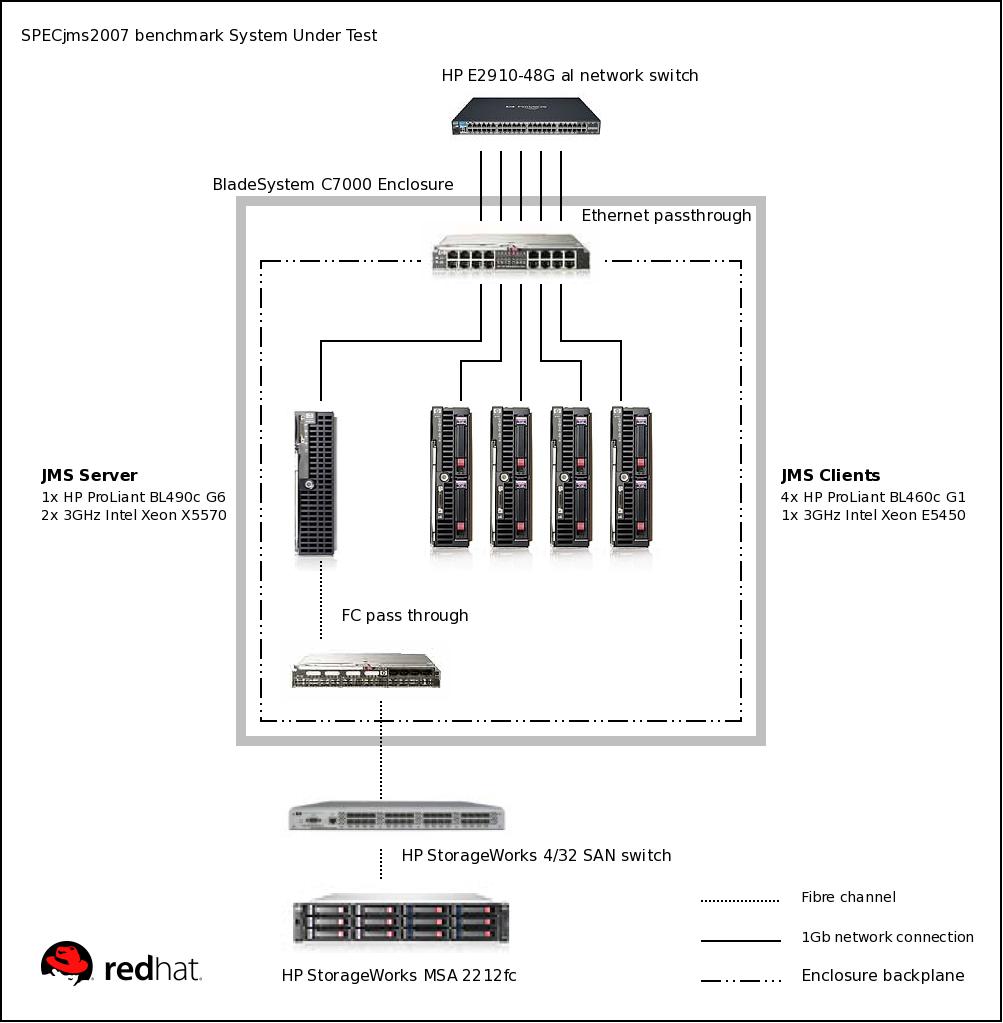

The server was a 2 chip 4 core CPU with 24576 MB of memory and a 1 GbE network
interface. The client's, of which there were 4, were 1 chip 4 core CPU with 22528 MB of
memory and also a 1 GbE network interface. The HornetQ journal is persisted using a
networked mass storage array available to the messaging server.
A few options were set on the JVM which were as follows:
- -XX:+UseLargePages - this enables large pages
- -XX:LargePageSizeInBytes - set the large page size
- -Xms and -Xmx - setting these both to 3800m stops any memory resizing delays
The following changes were made to the HornetQ Server configuration which were as
follows
- configuration.journal-min-files - this was set to a large number of files
- configuration.thread-pool-max-size - increased level of concurrency
For more detailed information about the benchmark see the DesignDocument
provided by SPEC. Additionally there is an academic paper detailing the workload characterization in greater detail.
Subscribe to:
Posts (Atom)